As I've blogged before, my background is a bit different than most Speech Language Pathologists. I started off in Deaf Education. Halfway through, I decided that I really wanted to do speech therapy. However, I loved my major. Therefore, I worked my tail off to make sure to take all the classes needed for both majors (but didn't quite double major) and then went on to get my Master's Degree in Speech Language Pathology. Ta Da! Here I am. Because I have a background in teaching, it means that I think a little differently than most SLPs. As Mrs. G (the most wonderful professor in all the world) would say, "it's not wrong, just different."
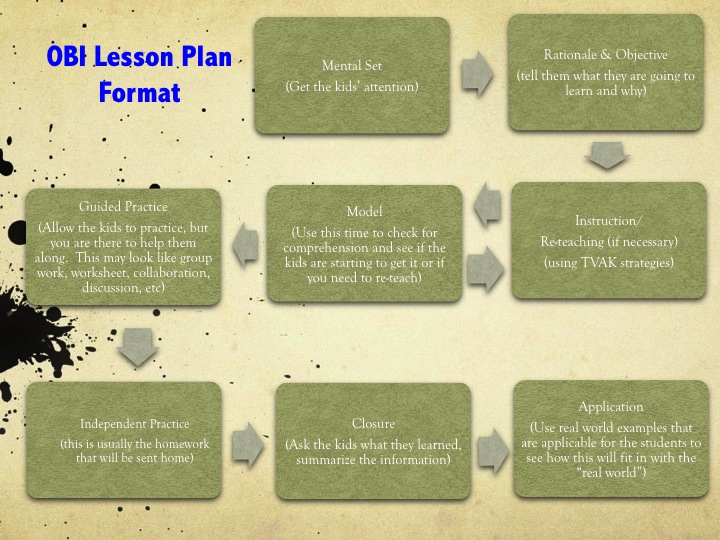
Anyway, we always learned the OBI lesson plan format. I'm not sure what OBI stands for anymore, but the lesson plan format has been engrained in me. It's a wonderful way to approach kids when teaching them anything and anywhere - not just in a classroom. I'll give an explanation of the format, there is a picture below for those of you who are visual learners.
1. Mental Set: This is the attention grabber. With little kids, I usually tried to have a physical object. I'd take it out and let the kids see it. They could describe it, ask questions, etc. The point is to grab their attention and get them interested in what they will be learning.
2. Rationale/Objective: These two really go hand-in-hand. You need to tell the kids what they will be learning (objective) and why they will be learning it (rationale). No one wants to learn something that will be "pointless" to them (not now and not when we were kids). Therefore, give them the meaning up front.
3. Instruction: Make sure to use TVAK strategies (see blog post from August 23for more information). You want to make sure that you are constantly monitoring the kids' understanding in order to know if you need to explain more, change your methods, etc.
4. Modeling: Modeling what you are learning is a great way to teach the kids what they should be learning. It's also a great way to check for comprehension. If the kids aren't getting it, then go back to instruction, which is now re-teaching
5. Guided Practice: As soon as you think the kids are getting the concept, then you can do some guided practice. If there is only one child, then you may let him/her take the reigns and try to achieve what you have taught. However, you are there every step of the way to make sure that the child has not gotten off track in his/her understanding. If there is a group, then you could do a group problem, have a few students collaborate, or have a discussion. Make sure you are walking around to monitor what is happening. At this point, you may realize that you need to go back to instruction and re-teach, then model again, and then try guided practice. However, let's assume the kids have it. What's next?
6. Independent Practice: This is the dreaded H-word... HOMEWORK!!! This is where you will give the students what their assignment will be. You could also give a short quiz or an in-class assignment. However, the key is that you are not helping and they are not collaborating. This is INDEPENDENT practice.
7. Closure: Now we need to tie up all the loose ends. Have the kids summarize what they learned. Make them "own" their learning experience.
8. Application: This is where you take the rationale and you give them a real world example of when they would use this skill. Make sure it is applicable to THEIR lives!
If you are an SLP, you're thinking. "That's all well and good, but how does this look in a 30 minute speech therapy session?" Here's a quick breakdown with an example.
Mental Set: Take out your describing cards (aids to help kids learn the different ways to describe) - 2 minutes
Rationale & Objective: Explain that we are going to learn to describe to make sure that their language is more colorful - 30 seconds
Instruction/Modeling: This is where we are showing the kids how to describe by bringing out pictures and objects. 10 minutes
Guided Practice: Now you are taking out an object or picture and letting the child try to describe and "win" your describing cards (for each thing he/she says, give them the coordinating card). 15 minutes
Independent Practice: Have some pictures printed out that they can take home to describe. You can explain this to the parents when you bring the child out to the waiting room. 1 minute
Closure: Have them tell you what they learned. 1 minute
Application: Let them know that this will help them in school with their writing and it's definitely needed if they ever want to become an author, screenwriter, journalist, etc. 30 seconds
 RSS Feed
