Click here for the pdf file
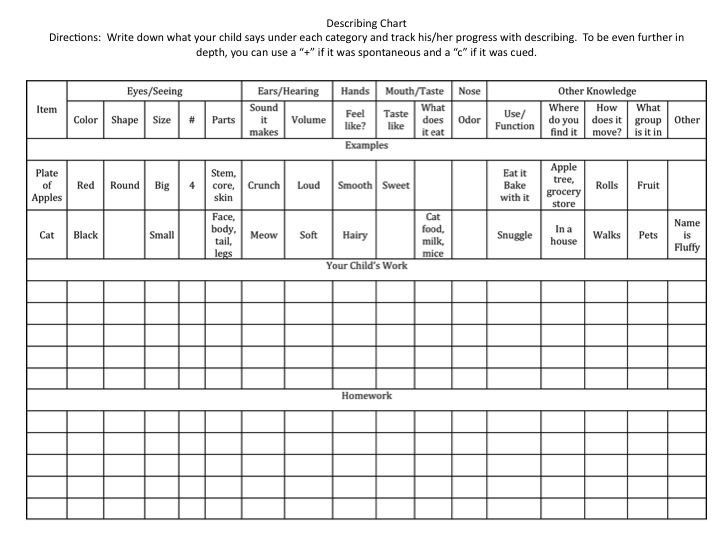
Now that we have completed our sensory box (that was all last week) and our kids have starting describing (hopefully), it's time to start tracking their progress. This is something that I came up with. It's not completely comprehensive, but it will give you a good idea of what types of things your kiddos say when describing. You will definitely see their strengths and their gaps. Then, you can go back and re-teach describing using that sense (hearing, touching, etc).
Click here for the pdf file
0 Comments
I know what you must be thinking about the title, "I'm pretty sure that 'movement' is not one of the 5 senses." However, unless you plan on replacing the taste items each time you use your box or you are doing this with your child, then you may want to focus more on movement rather than taste. I'll touch on both in this blog. Taste: You will want to collect things that have different tastes: salty (salt), sour (lemon), sweet (candy), bitter (cocoa powder - the unsweetened kind). My personal favorite when teaching "taste" is bitter. The kids see the cocoa powder and think, "chocolate!!!" However, their taste buds get something very different than what they are expecting. You can also talk about what animals eat (mice eat cheese, cats drink milk, etc) within this category. Things that Move: Because I use this box at work, I've focused on things that move. This will hit upon the use or function of objects, which is another way to describe. Although it's not one of the 5 senses, kids like to move around and so it's something they can relate to easily. I've chosen 3 items: wind up toy (that actually goes in circles), car, and ball. You can talk about it's action (flying, driving, rolling, bouncing, throwing, catching, etc). You can describe the direction (forward, backward, up, down, around). You can even talk about where you see these objects (on the golf course, in the air, on the street). Get creative when talking about how things move! Sometimes we have to be very creative with our sense of "smell" as it relates to the sensory box. The best way I have come up with creating things that "smell" are using craft sticks, index cards, dry things that have a scent (jello packets, cocoa powder, etc), and flavorings (almond, vanilla, etc).
Dry scents: Using the jello packets (just the powder, do not make jello) and/or cocoa powder, place some glue on the index card and sprinkle the powder onto the glue. Let it dry. Then place it in it's own plastic bag. You will need to take it out of the bag for the child to smell the scent and see if they know what it is. You can also draw a picture of what it is on the back (or print out a picture). Wet scents: Craft sticks/popscicle sticks work best for wet scents because the wood holds onto the smell. Dip about 2 inches of the craft stick into the desired flavoring (vanilla, almond, orange, mint, etc) and let it soak for about a minute. Then, let it dry. Place it in it's own bag as well (you don't want the smells to start to mingle). You can write the smell on the end of the craft stick. Ta Da! You have yourself some scents for your sensory box! Are you just tuning in? We are talking about creating a sensory box to teach kids how to describe. Using our five senses is a great way to get kids tuned into describing. These are things that they see, hear, touch, taste, and smell everyday, but don't realize that that is what describing is all about. Click here to see Monday's blog to get caught up fast! Kids love to touch everything! How many times did I hear, "look with your eyes, not with your hands" when I was in a store with my mother? A bazillion! That's because she knew I would always want to see how things felt. When you are creating your sensory box, you will want to try to target as many feeling sensations as possible:
I chose a piece of craft foam for smooth, cotton ball for soft, a piece from "clippo hippo" (my son's toy) for bumpy, and a small piece of sandpaper for rough. I would love to add squishy and sticky, but I didn't have those around my house and will scour the dollar store for something that fits the bill! If you missed yesterday's blog, then click here to catch up fast! We are talking about creating a sensory box in order to better teach kids how to describe. Again, it can also be used as a great listening activity.
Hearing is a great one to do after sight because the kids can close their eyes (which we just worked on) to get an entirely different set of characteristics from one of their senses. Therefore, they can really start to understand how their eyes truly do tell them different information than their ears. You hearing can tell you if something is:
Have you ever tried to teach describing and felt like you were hitting a brick wall? Was it a hard concept for your kiddos to really understand? Did you try attribute cards, visual aids, cuing/prompting/questioning, etc and still found that your client/child was struggling? If so, maybe a sensory box is the ticket for you (and your child). I like to teach describing using our 5 senses. This week, I will be blogging about one sense per day. At the end of the week, I'll also attach the describing worksheet that I use to track my clients' progress. Seeing Personally, I think that starting with the sense of sight is the easiest for most kids. Our eyes tell us characteristics such as: color, shape, size, number, parts, etc. Kids (even very young children) can usually at least name the color, shape, and size of an object. That gives the kids the feeling of success early in the describing game. First we talk about all of the characteristics that our eyes can tell us about an object. I then take out an object and we talk about each of these characteristics pertaining to the object. For example: This pinwheel is...
As the week goes on, you will see that some of my items will overlap into other categories. Also, remember that these are merely SUGGESTIONS. You can pick any items that you would like! Start looking around your house and collecting up things to put into your sensory box. A sensory box is also very useful when working on listening comprehension. You can use it to saying things like: "find the red item", "find the round item", etc. It will give you varying items all in one box! You can see the items that I chose to the left. They represent the following characteristics: Size: big, small, tall, thin/skinny, fat/wide Color: colorful, dark, shiny Shape: Rectangle, round, triangular Parts: some have many parts and some are only one solid piece Number: Although I only have one of each item (I could cut more triangles), the ant/rattle has four legs, four bells, two antennae, etc. The car also has four wheels, one steering wheel, etc. Bath time can be such a great time for learning and fun! Just think about all the different toys that can be placed in the bath-tub and all the language that can surround those toys (boats, balls, waterproof books, water animals, etc). Well, here is one "toy" that you can make yourself that won't break the bank!! All you need is some craft foam and scissors! I found craft foam at the dollar store for... well... $1!! Simply cut out the shapes, numbers, or letters that you would like and sprinkle them in the bath tub. With a little water, they will stick to the side of the tub for hours of fun! These little shapes can provide big language learning opportunities. You can cut out shapes and teach your child about shapes. Shapes can also build things (a square and a triangle can make a house). You can use just one color and teach that one color or naming an attribute and a color (blue star, blue square, etc). You can build an entire scene and talk about what your child sees (tree, sun, cloud, waves, fish, etc). You can put them up and ask for a specific item, which works for kids working on listening comprehension skills. The possibilities are endless. If you have any questions about how you can tailor this activity to your child's specific needs, feel free to send me an email through my contact page or find me on facebook (there is a link on the home page) and send me a message! ASHA had a great article the other day about working with kids who are Deaf/Hard of Hearing. It has some great tips. Click here to read it!
P.S. This is what I call a "lazy blog". :o) However, it is good information and I love to share good information! I tend to get behind on my reading (well, on a lot of things, but reading is one of them). I was working on catching up the other day by reading "Parenting" magazine's February 2012 issue. They had a great article called "Raise the Next Steve Jobs (or at least a really, really bright kid)". Now, I don't want Timothy to be the next Steve Jobs (he had quite the sordid past), but I do want Timothy to be smart and have every advantage possible.
They had some great ideas - not all of which I agree with, but then again, we never agree with 100% of the people 100% of the time, right? Anyway, at the end of the article, the writer had a section on different toys that are great for learning. She called it, "Your Genius Tool Kit". Most of the toys included were "low tech toys", AKA things that don't require batteries. That got me thinking. We buy the "latest" and "greatest" in the toy/movie industry to help our kids be smarter. However, we got to this point without everything being battery-operated and we're pretty smart too, right? Let's examine some "low tech toys" (that are usually cheaper) that help promote learning:
This is just the tip of the iceburg. However, I want you to stop and think about the toys you pick up for your children or for a birthday present. Remember that if you engage your child with the toy, that will quadruple (at least) the learning capacity for a toy. Another great website that I tripped across this past week is called 123 Listening. The part that I will blog about is called, "Listening Worksheet Templates." The best part about this website is that it has the software built in to create listening worksheets. It's easy too! You simply select the type of worksheet that you want to make (2 options, 3 options, matching, writing under the picture, match and write) and the words. You then create the worksheet and the pictures magically appear!
I created a listening page for adjectives. My intent was not to use it with someone who is working on listening comprehension, but working on antonyms. Therefore, I used opposing adjectives. I chose dark/light, clean/dirty, dry/wet, near/far, old/new, empty/full, fast/slow, strong/weak. The pictures are really entertaining and get the point across. Another great feature is that I can print one to use as a worksheet and print another on cardstock, cut it up, and create flashcards! This website has: adjectives, animals, body parts, chores, classroom, colors, daily routines, feelings/emotions, foods, hobbies, holidays (several different ones), prepositions, questions, science, verbs, weather, and more! You could even use the website just to retrieve the pictures. Check this great website out for pictures, language activities, and listening activities! |
AuthorHilary is a speech-language pathologist who has a bachelor's in deaf education. She is a Christian, an Army wife, and a mother of two. Archives
October 2013
Categories
All
|